Search This Blog

Sunday, December 15, 2013

ICF walls and First Floor Framing Are Complete

We have built a few houses but I always seem to forget how long it takes to build.  I do think it takes longer in Florida though;  we are on island time here.


There has  been a lot of progress since my last post though.    After the first floor walls were poured, the framers came in and framed the first floor, put the stairs in and the sub-floor for the second floor.


More framing


The ICF Blocks were placed for the second floor walls


The concrete trucks returned and poured the walls


You can barely see the concrete equipment here.


Bay view from second floor.


Dwight and our builder, Frank, checking out the view from upstairs.


View toward the street from the second floor.

The roof joists will go up next, and the upstairs framing will be done, then the roof will go on.  The windows are in and will also be installed.  While the contractors have been working on the house we have been meeting with cabinet makers.  We have selected one and the final design is in process.  We have to get the cabinet design completed so the electrician will know where to wire for lights and outlets.  We have also been trying to choose a front door.  While in Houston for Thanksgiving, we went to several lighting stores to look at light fixtures but made no progress there.  Our taste usually are pretty similar but light fixtures are a different story so we have to figure out this one.  

I wish you all a Merry Christmas and Happy New Year.  


Sunday, October 27, 2013

Concrete Walls

Buiding a concrete house is interesting and different from building a typical frame house.  The first level ICF walls are 12 inches thick, are now in place and the concrete has been poured in them.   It took about 6 weeks to finish installing the blocks, bracing with a lot of steel braces and building wood frames around the window and door openings.


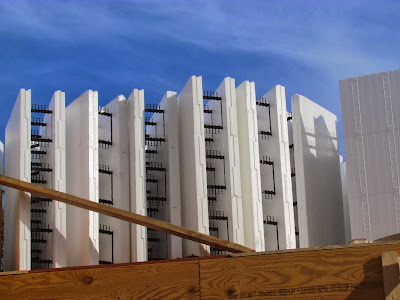
This is the inside of one of the ICF blocks.  The area in the center is where the concrete is poured.


The concrete trucks arrive.  It took quite about 10 truck loads for this project..


The mixer truck dumps the cement into a hopper and it is pumped up through the arm that they use to put the cement into the blocks.


This 


A cement specialist makes sure that the mixture goes down into the block.  


They pour about 2 feet into the block and then they use a vibrator to vibrate it so that the cement settles into the blocks properly.  Then they move around the house doing this and back around with another 2 feet until the blocks are filled.


This is looking on the inside of the house and you can see al the metal bracing that they have to use to secure the blocks before pouring the concrete.

The next step is to remove all the metal bracing and then the framers will be in to install framing and the floor for the second level.  After the floor is in the ICF Block installers will be back to put the blocks in place for the second level.  They have to have the floor in place to stand on.  The second level should not take as long as the first because there aren't as many window and door openings.

Thanks for stopping by.

Friday, September 27, 2013

Birthday Card and Gift Card Holder Set

As many of you know, one of my hobbies is stamping and paper crafting and that I will be posting some of my projects on this blog.  

Today I have a birthday card and a birthday gift card holder set to share.  The card is an A2 size  (4.25" x 5.5").  I used the Stampin Up set Secret Garden and the coordinating dies for cutting to create this set.  

I stamped the background white flowers with Versamark ink onto Stampin Up Smoky Gray cardstock and embossed with white detail embossing powder.   I also stamped the red flowers with Versamark ink onto the Smoky Gray cardstock and embossed them with white detail embossing powder.  I then used a sponge and Strawberry Slush Stampin Up dye ink to sponge the color onto the red flowers.  I did this instead of using red cardstock and embossing the red because the red has more depth and also has some gray undertones which looks good with the gray background.  The leaves are cut from Stampin Up Wild Wasabi cardstock using one of the coordinating dies.  I then sponged a darker green ink on the leaves to add interest.  I used a Stampin Up scallop edge punch to cut the white scallops and cut the sentiment banner freehand, used Smoky Slate ink to sponge the edges and stamp the sentiment. 

I assembled the card using Tombow Mono Multi and popped up the scallop layer and the red flowers using Stampin Dimensionals then added rhinestones to the centers of the flowers.


The gift card holder started with a 4.25 x 11" piece of Smoky Slate cardstock scored at 3", 5.5", and 8" and folded in the shape of an M.


Using the Word Window punch from Stampin Up punch it twice on the edge of the center fold.  Then punch out the center with the petit Curly Label punch ( or a circle punch) Use Redline tape to finish the card pocket and add the ribbon to keep the card closed.


Thanks for visiting my blog.


Monday, September 23, 2013

The Walls Go Up and the Pool Takes Shape

After doing a lot of research, we decided to build an ICF (Insulated Concrete Forms) home.  There are many advantages to building with ICF especially in coastal areas.  The walls will be about 12 inches thick and are actually concrete.  The forms are put together and with rebar in them and then concrete is poured inside.  Some of the advantages of an ICF home are:  Energy efficiency, 32% less energy required for cooling and 42% less for heating.   This also means the HVAC units can be sized smaller.   Protection during storms, both tornadoes and hurricanes.  This is a big plus when building on a bay in the Florida Panhandle.  Insect resistance Termites don't like to eat concrete.  Fire resistance,   Concrete doesn't burn.  All of these features also help to reduce insurance costs.  From what we hear, ICF homes are also really quiet. 

Materials are delivered.  These are the ICF Blocks made by Fox Blocks


The wood is for framing around window and door openings


Assembling the walls reminds me of putting Legos together


View from the driveway of the walls going up.


The gunite (a concrete mixture) gets sprayed on layer by layer to construct the pool.  They are working on the spa in this picture.

The pool will be finished when the house is near completion.


Friday, September 13, 2013

Progress Between The Rains

Rain, rain go away and come again another day!

According to Frank, our builder, it rained for 58 days (about 40 inches) after we started clearing the lot for building so this made progress really slow because it was too wet to do much and even when you could the dirt yard would be closed because it was too wet to haul sand and we need a lot of fill sand.  In between the rains they did manage to get enough sand.


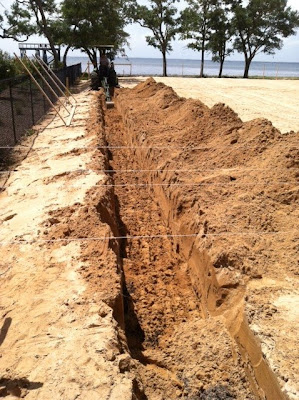
They leveled it and then dug the trench for the footings


The concrete trucks arrived and poured the footings.


 Then the block layers arrived and laid the blocks for the foundation


Then hauled in more sand to fill in the blocks and then it was leveled again.


 The plumbers and electricians installed the pipes and wire that need to be in the floor and then the rebar was laid before the concrete trucks returned with more loads of concrete.


There are 2 miles of rebar in this foundation.  One thing that surprised me is they ran sprinklers on the concrete over night to keep it wet for the curing process.  This is supposed to minimize the cracking.


In the mean time the pool company dug the hole for the pool and it promptly filled up with rain water.


The pumps came in handy to empty it so that the pool company could set the forms for the pool.


There has been progress every day since the rains stopped.


Friday, June 28, 2013

Lot Prep Complete

Greetings from Driftwood Point.

We have seen some real progress since my last post.

We now have permits---YAY!


We had to install a temporary driveway because the soil is sandy and materials could not be delivered.  The drive was built up with red clay and then overlayed with crushed concrete. This will also be used to build the driveway on later.


The area where the house will be has been built up about three feet in order to get into flood zone X.  This means that flood insurance will be less expensive.  If you look closely you will see the surveyor's tripod.  He is the one who determines the elevation of the lot.


 Materials for starting the foundation - re-bar and boards were delivered.


Digging for the foundation is underway.


Necessities like the Dumpster ...and...


Most important of all the Porto-potty are now setting on the site.

Thanks for stopping by.  

Sunday, May 26, 2013

Choosing a Builder and Lot Clearing

We didn't know any builders in the Destin area so we asked everyone that we thought might know a builder and then checked them out.  Our architect also had a few recommendations and we interviewed them plus others that we had heard about or who seemed to have a good reputation in the area.  One of the things that surprised us is that homeowners were very happy to open their homes and let us look.  The builders were always eager to show us homes that they had built and ones that were under construction so we got a tour of many beautiful homes.

We ended up choosing three builders to give us a proposal.  Since our home is a cost plus fixed fee contract, we knew that cost was not the only consideration.  The cost will largely depend on the choices that we make so we wanted a builder that we liked,  had a good relationship with the clients that we met, was financially strong,  had great finish work, would be on the job a lot and solicited bids from multiple sub-contractors.

We signed a contract with Frank Janssen Construction Management.  Frank is a retired Air Force Officer and has been building homes for about ten years.  The homes that he showed us were beautiful, we like him, and he will park an office trailer on our lot and be on site every day.

Frank wasted no time getting started.  He has applied for building permits which can take up to six weeks to be issued and has started preparing the lot for building.  We were sad that some trees had to be removed but the tree survey showed 82 trees bigger that 12 inches in diameter so we still have lots left and we needed a spot to build our home.

The company that is clearing the lot has been working a week and made great progress.
The lot after it was bush hogged.

 Removing trees
 Some trees were really big
 The dump trucks haul away the downed trees
 Several large tree roots were too big for dump trucks and had to
be removed with a flat bed truck.
 The house will set here
From the street the drive curves between the trees.

Thanks for stopping by.

Friday, May 24, 2013

Starting the New Home Building Process

For us, the process of building our dream home started with finding a lot that we love.  We found and purchased a 1.6 acre lot that is bay front and has many large Live Oak trees.   The header picture is our view looking toward the West and down the shore.  The Pelicans seem to like the pilings from an old pier.  This is what it looked like when we bought it.   
 Looking from the bay toward the street.
Looking toward the bay.

The next step in the process was to find an architect.  We knew that we wanted to build a Mediterranean house so wanted to find an architect whose portfolio included some Mediterranean homes that he/she had designed.  Most local architects that we interviewed seemed to design the Florida Cottage style. We decided to use B Designs of Destin because he had designed many homes in the style we wanted to build.  Eric was great at capturing the things that we wanted in a new home.  The design process took many months and several tweaks but we now have plans that we are excited about.

Tuesday, May 7, 2013

Test Post
I have created this blog to share paper craft creations and the construction of our new home.