Search This Blog

Friday, September 27, 2013

Birthday Card and Gift Card Holder Set

As many of you know, one of my hobbies is stamping and paper crafting and that I will be posting some of my projects on this blog.  

Today I have a birthday card and a birthday gift card holder set to share.  The card is an A2 size  (4.25" x 5.5").  I used the Stampin Up set Secret Garden and the coordinating dies for cutting to create this set.  

I stamped the background white flowers with Versamark ink onto Stampin Up Smoky Gray cardstock and embossed with white detail embossing powder.   I also stamped the red flowers with Versamark ink onto the Smoky Gray cardstock and embossed them with white detail embossing powder.  I then used a sponge and Strawberry Slush Stampin Up dye ink to sponge the color onto the red flowers.  I did this instead of using red cardstock and embossing the red because the red has more depth and also has some gray undertones which looks good with the gray background.  The leaves are cut from Stampin Up Wild Wasabi cardstock using one of the coordinating dies.  I then sponged a darker green ink on the leaves to add interest.  I used a Stampin Up scallop edge punch to cut the white scallops and cut the sentiment banner freehand, used Smoky Slate ink to sponge the edges and stamp the sentiment. 

I assembled the card using Tombow Mono Multi and popped up the scallop layer and the red flowers using Stampin Dimensionals then added rhinestones to the centers of the flowers.


The gift card holder started with a 4.25 x 11" piece of Smoky Slate cardstock scored at 3", 5.5", and 8" and folded in the shape of an M.


Using the Word Window punch from Stampin Up punch it twice on the edge of the center fold.  Then punch out the center with the petit Curly Label punch ( or a circle punch) Use Redline tape to finish the card pocket and add the ribbon to keep the card closed.


Thanks for visiting my blog.


Monday, September 23, 2013

The Walls Go Up and the Pool Takes Shape

After doing a lot of research, we decided to build an ICF (Insulated Concrete Forms) home.  There are many advantages to building with ICF especially in coastal areas.  The walls will be about 12 inches thick and are actually concrete.  The forms are put together and with rebar in them and then concrete is poured inside.  Some of the advantages of an ICF home are:  Energy efficiency, 32% less energy required for cooling and 42% less for heating.   This also means the HVAC units can be sized smaller.   Protection during storms, both tornadoes and hurricanes.  This is a big plus when building on a bay in the Florida Panhandle.  Insect resistance Termites don't like to eat concrete.  Fire resistance,   Concrete doesn't burn.  All of these features also help to reduce insurance costs.  From what we hear, ICF homes are also really quiet. 

Materials are delivered.  These are the ICF Blocks made by Fox Blocks


The wood is for framing around window and door openings


Assembling the walls reminds me of putting Legos together


View from the driveway of the walls going up.


The gunite (a concrete mixture) gets sprayed on layer by layer to construct the pool.  They are working on the spa in this picture.

The pool will be finished when the house is near completion.


Friday, September 13, 2013

Progress Between The Rains

Rain, rain go away and come again another day!

According to Frank, our builder, it rained for 58 days (about 40 inches) after we started clearing the lot for building so this made progress really slow because it was too wet to do much and even when you could the dirt yard would be closed because it was too wet to haul sand and we need a lot of fill sand.  In between the rains they did manage to get enough sand.


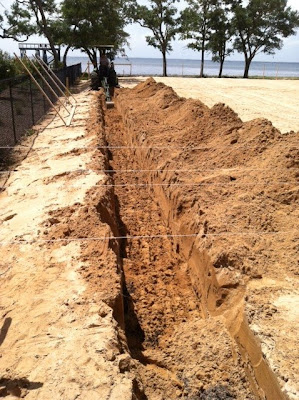
They leveled it and then dug the trench for the footings


The concrete trucks arrived and poured the footings.


 Then the block layers arrived and laid the blocks for the foundation


Then hauled in more sand to fill in the blocks and then it was leveled again.


 The plumbers and electricians installed the pipes and wire that need to be in the floor and then the rebar was laid before the concrete trucks returned with more loads of concrete.


There are 2 miles of rebar in this foundation.  One thing that surprised me is they ran sprinklers on the concrete over night to keep it wet for the curing process.  This is supposed to minimize the cracking.


In the mean time the pool company dug the hole for the pool and it promptly filled up with rain water.


The pumps came in handy to empty it so that the pool company could set the forms for the pool.


There has been progress every day since the rains stopped.